
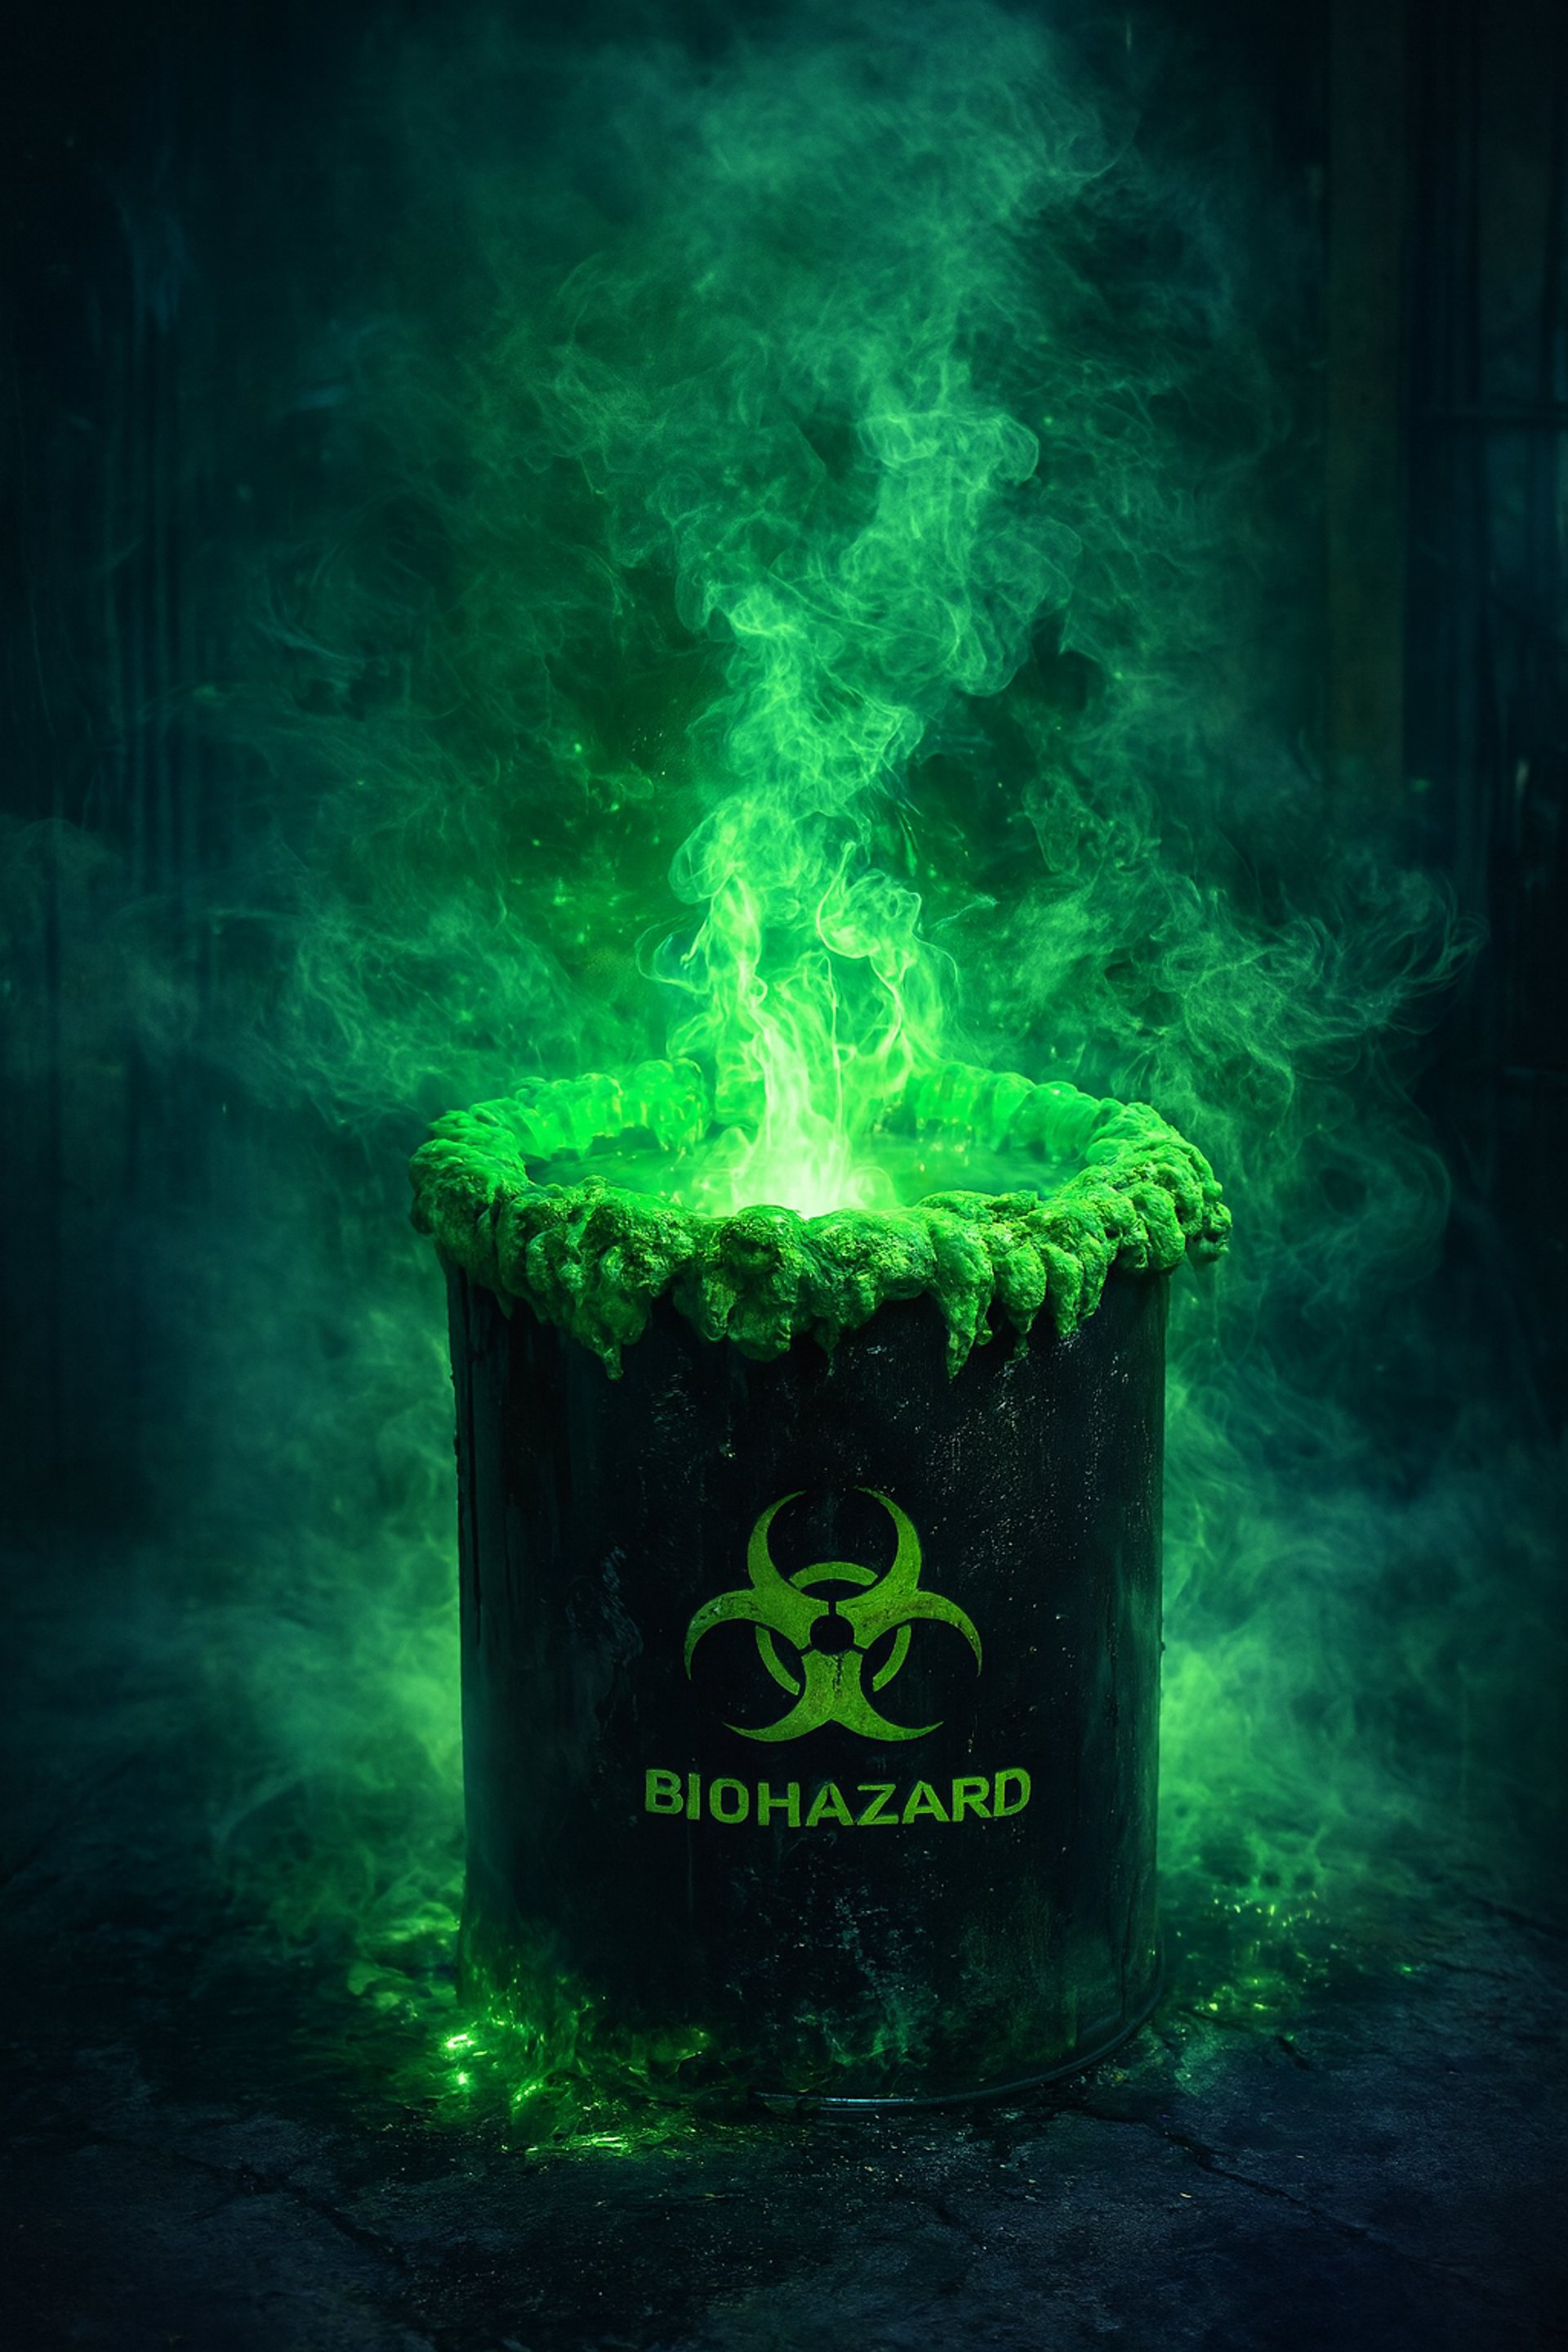
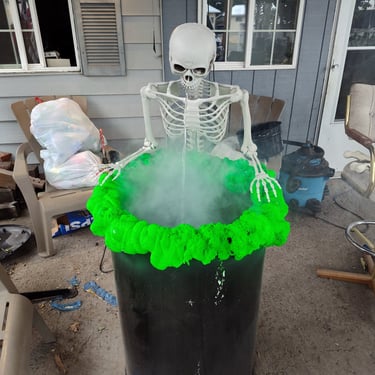
💀 THE TOXIC FOUNTAIN
A Defiant Heart Haunted Creation — Full Tutorial This is how I built my toxic skeleton fountain for my Halloween haunt — the one with the green glow, the bubbling water, the fog, and the skeleton dripping toxic sludge. I made mine mostly with scavenged materials and whatever I had on hand, so feel free to adjust this to fit your setup. If you want something that looks haunted, messy, radioactive, and alive… this will get you there.
HANDMADEREPURPOSED MATERIALS
Anastasia
11/23/20259 min read
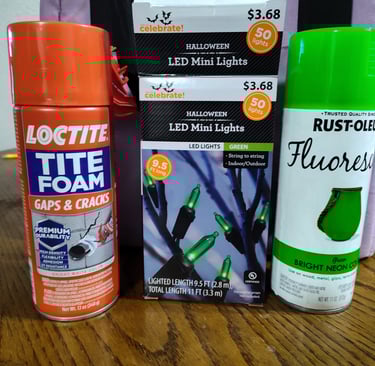
Materials I Used
Base & Structure
1 metal barrel (mine was free from work)
1 round bucket
1 coffee tin (only used this to keep my fog machine elevated and away from any possible water build up in the bottom of the barrel.)
Skeleton (full or torso)
Clear flexible tubing
Zip ties (lots)
Water & Fog
Submersible water pump
Fog machine
Fog tubing or PVC (optional)
Lighting
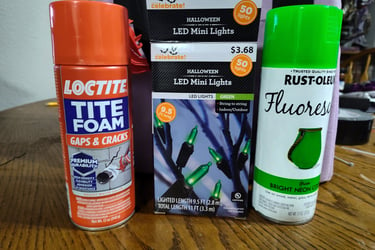
Green outdoor string lights
Blacklights / UV lights
Extension cords & power strip
Paint, Texture & Effects
Fluorescent green paint
Spray foam insulation
Black spray paint (optional)
Clear sealant spray (optional)
Tools
Drill
Gloves (for spray foam)
Scissors or utility knife

Step 1 — Preparing the Barrel, Reservoir, and Interior Lighting
The first thing I did was get the inside of the barrel ready before adding any foam or the skeleton. Since I wanted to be able to remove everything later and reuse the barrel for storage, I kept all lighting and wiring inside, not built into the foam.
Start with your barrel.
Mine was a metal drum from work — free — so that’s what I used.Drill a hole near the bottom.
This is for cords, the pump line, and fog tubing.
Make sure it’s large enough for everything you’ll be running through.Drill a couple smaller holes on the bottom to prevent any unwanted water build up.
Place a plastic bin or tote inside the barrel.
This will be your hidden water reservoir.
Choose one deep enough to keep the pump fully submerged during operation.Put the submersible pump inside the bin.
Don’t plug it in yet — the tubing comes later.Check that all cords fit through the drilled hole cleanly.
Make adjustments if needed so nothing pinches or bends.
➤ Installing the Green Outdoor String Lights (last part of Step 1)
Since I knew I would be removing everything after Halloween, I kept the lights simple and easy to take out:
Lay green outdoor string lights inside the barrel.
I placed them around the inner walls
Behind the water bin
And toward the back where they glow through the open top/front
This gives the whole interior a “radioactive” green glow.
Run the cord out through the bottom hole.
Keep everything inside removable so the barrel can be emptied later. I Just used black duct tape to hold it in there.
Quick light test.
Turn them on to make sure the glow looks good before adding foam.
Why this is important:
You don’t want to trap your lights inside hardened foam if you know you’ll be using this barrel for storage later. Keeping all lights INSIDE the barrel makes the whole build modular and reusable.
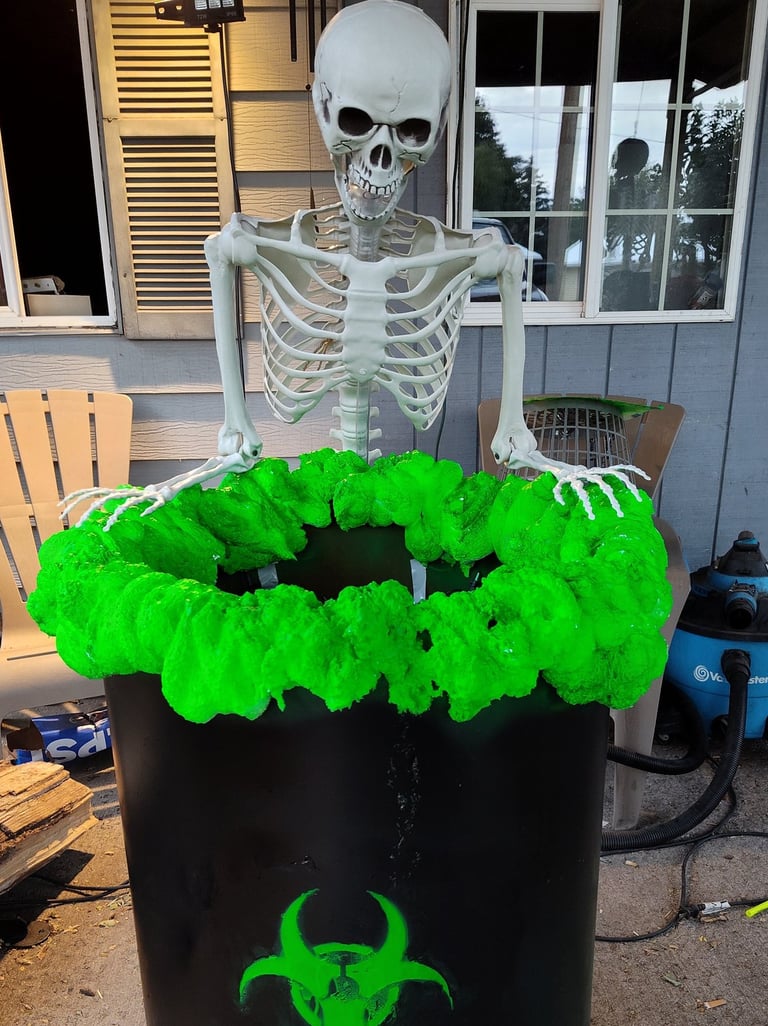
Step 2 — Adding Spray Foam for the Toxic Texture
Once the barrel interior, cords, bucket, lights, and fog machine placement were figured out, the next thing I did was add the spray foam.
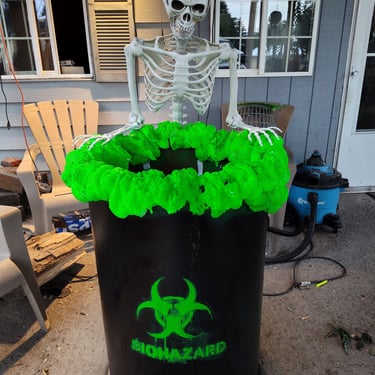
This creates the lumpy, dripping, “radioactive buildup” texture.
And yes — I did ALL of this before the skeleton ever touched the barrel. You could drill holes and use zipties to secure his hands to the top and do the foam so his hands are in it but then I wouldnt have been able to separate it like i wanted to.
Shake the spray foam can really well.
This helps it expand more evenly.Apply the foam anywhere you want toxic texture.
I focused mainly on:The front rim of the barrel
The top edges
The areas where the skeleton would visually sit into
Parts where “sludge” would naturally drip or foam over.
Let it expand and do its thing.
Spray foam always looks chaotic at first — that’s normal.
It will puff up, bubble, twist, and create the perfect uneven surface you want.Let it fully dry.
Depending on temperature, it can take several hours to overnight.Trim or shape the foam only if needed.
I personally left most of it natural because the raw, messy shape added to the toxic look.Paint the dried foam fluorescent green.
This is where the magic happens.
UV paint + blacklights = extreme glow.Add black paint around creases for depth (optional).
Light black shading makes everything look aged and toxic.
✔️ Notes About This Step
Painting the foam BEFORE the skeleton makes cleanup easier.
Once dry, the foam stays in place even when you remove everything else for storage.
Step 3 — Attaching the Skeleton to the Barrel
Once the spray foam was dry and painted, the next thing I did was attach the skeleton.
This step is important because the skeleton becomes the centerpiece and will hide the cords, the back hole, and most of the structural elements.
Here’s how I did it:
Find the position you want first.
I angled the skeleton so it looked like it was throeing up into the toxic sludge, leaning forward just enough to look natural but creepy.Hold it in place and get the main anchor points.
Before zip-tying anything tightly, I made sure:The head was angled correctly
The arms were where I wanted them
The chest aligned with the foam texture
The back covered the drill hole and cords
Use heavy-duty zip ties to secure the skeleton if necessary. you can drill holes in the foam for zipties to help secure skeleton hands to barrel.n
The goal is to make it stable without being obvious.
Check movement and stability.
Gently push or wiggle the skeleton to make sure nothing shifts.
This matters because once water starts flowing, you don’t want it tipping forward or sliding.Hide the zip ties in shadows.
Most will naturally disappear under blacklight/UV, but you can also paint or position them for extra concealment.Make sure the skeleton is lifted slightly away from the inner edges.
This makes room for tubing later and prevents water from splashing in the wrong direction.
✔️ Notes About This Step
The skeleton hides the back hole and cords beautifully.
Attaching it AFTER foam ensures it looks “embedded” into the toxic growth.
Zip ties are strong, removable, and perfect for seasonal setups.
This step sets the foundation for where the water will pour later.
Step 4 — Installing the Tubing for the Water Flow
Once the skeleton was secured to the barrel, the next step was setting up the tubing that carries the water from the pump up through the skeleton and back down in the “toxic” stream.
Here’s exactly how I did it:
1. Start with clear flexible tubing.
I used clear tubing because under blacklight it basically disappears, and it hides well behind bones and shadows.
2. Thread the tubing through the skeleton.
I ran the tubing:
On the inside of the spine. At the mouth i positioned the hose just at the end of the teeth where it wont block water and about an inch back i put a screw to hold the tubing in place.
3. Secure the tubing with zip ties.
This is important.
You want the tubing to:
Stay in place
Not shift once water starts running
Stay hidden in shadows
Zip ties work perfectly for this and blend right in.
4. Run the bottom end of the tubing down into the barrel.
Feed it down through the pelvis and into the Harbor Freight bucket where the pump sits.
Make sure:
The tubing reaches the pump
There are no kinks
It doesn’t bend too sharply anywhere
5. Attach the tubing to the pump.
Push it down securely.
This is what will create the “toxic pouring” effect.
Do not plug the pump in yet — testing comes later.
✔️ Why This Step Matters
Clear tubing helps the illusion that the “toxic water” is coming straight from the skeleton.
Zip-tying prevents the water stream from shifting or misdirecting.
Running the tubing AFTER the skeleton is secured keeps everything in the right place.
Testing will be easier once lights and fog are also active.
Step 5 — Setting Up the Fog Machine
After the tubing was secured and the skeleton was fully attached, the next step was adding the fog machine.
This is what gives the fountain that drifting, toxic, “radioactive” atmosphere.
Here’s exactly how I set it up:
1. Place the fog machine inside the barrel.
I positioned mine behind the water bucket so the fog would rise upward and around the skeleton.
Because there’s always a chance of moisture building up inside the barrel:
2. I elevated the fog machine using a coffee tin.
This kept it from sitting directly on the bottom where:
Condensation might pool
Spray foam paint residue could collect
Water from the fountain might drip through drainage holes
The coffee tin keeps the fog machine dry and safe while still low enough to hide it.
3. Plug the fog machine into a separate power source.
Don’t overlap cords with the pump.
Keep all electrical away from splash zones.
✔️ Why This Step Matters
Elevating the fog machine prevents water damage
Fog makes the entire fountain feel alive
Keeping all cords in the back hole keeps the front clean and cinematic
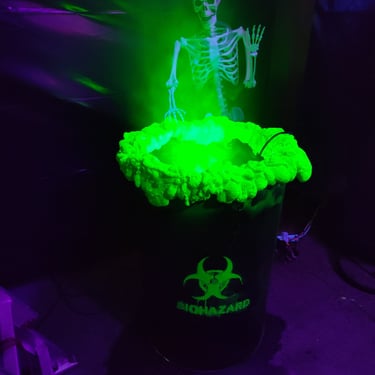
Step 6 — Setting Up the Blacklights and Activating the Glow
Once everything inside the barrel was set — bucket, pump, green string lights, fog machine on the coffee tin — the last lighting step was adding the blacklights.
This is where the fountain truly came alive.
1. Place the blacklights on the roof of your carport.
This is exactly how I did it.
I mounted or placed my blacklights up high, on the roof of my carport, and aimed them downward toward the fountain.
This angle does a few things:
Lights the top of the skeleton and the foam evenly
Makes the fluorescent paint glow intensely
Casts long shadows for a dramatic haunted effect
Keeps the lights completely out of sight
Leaves the ground open and uncluttered
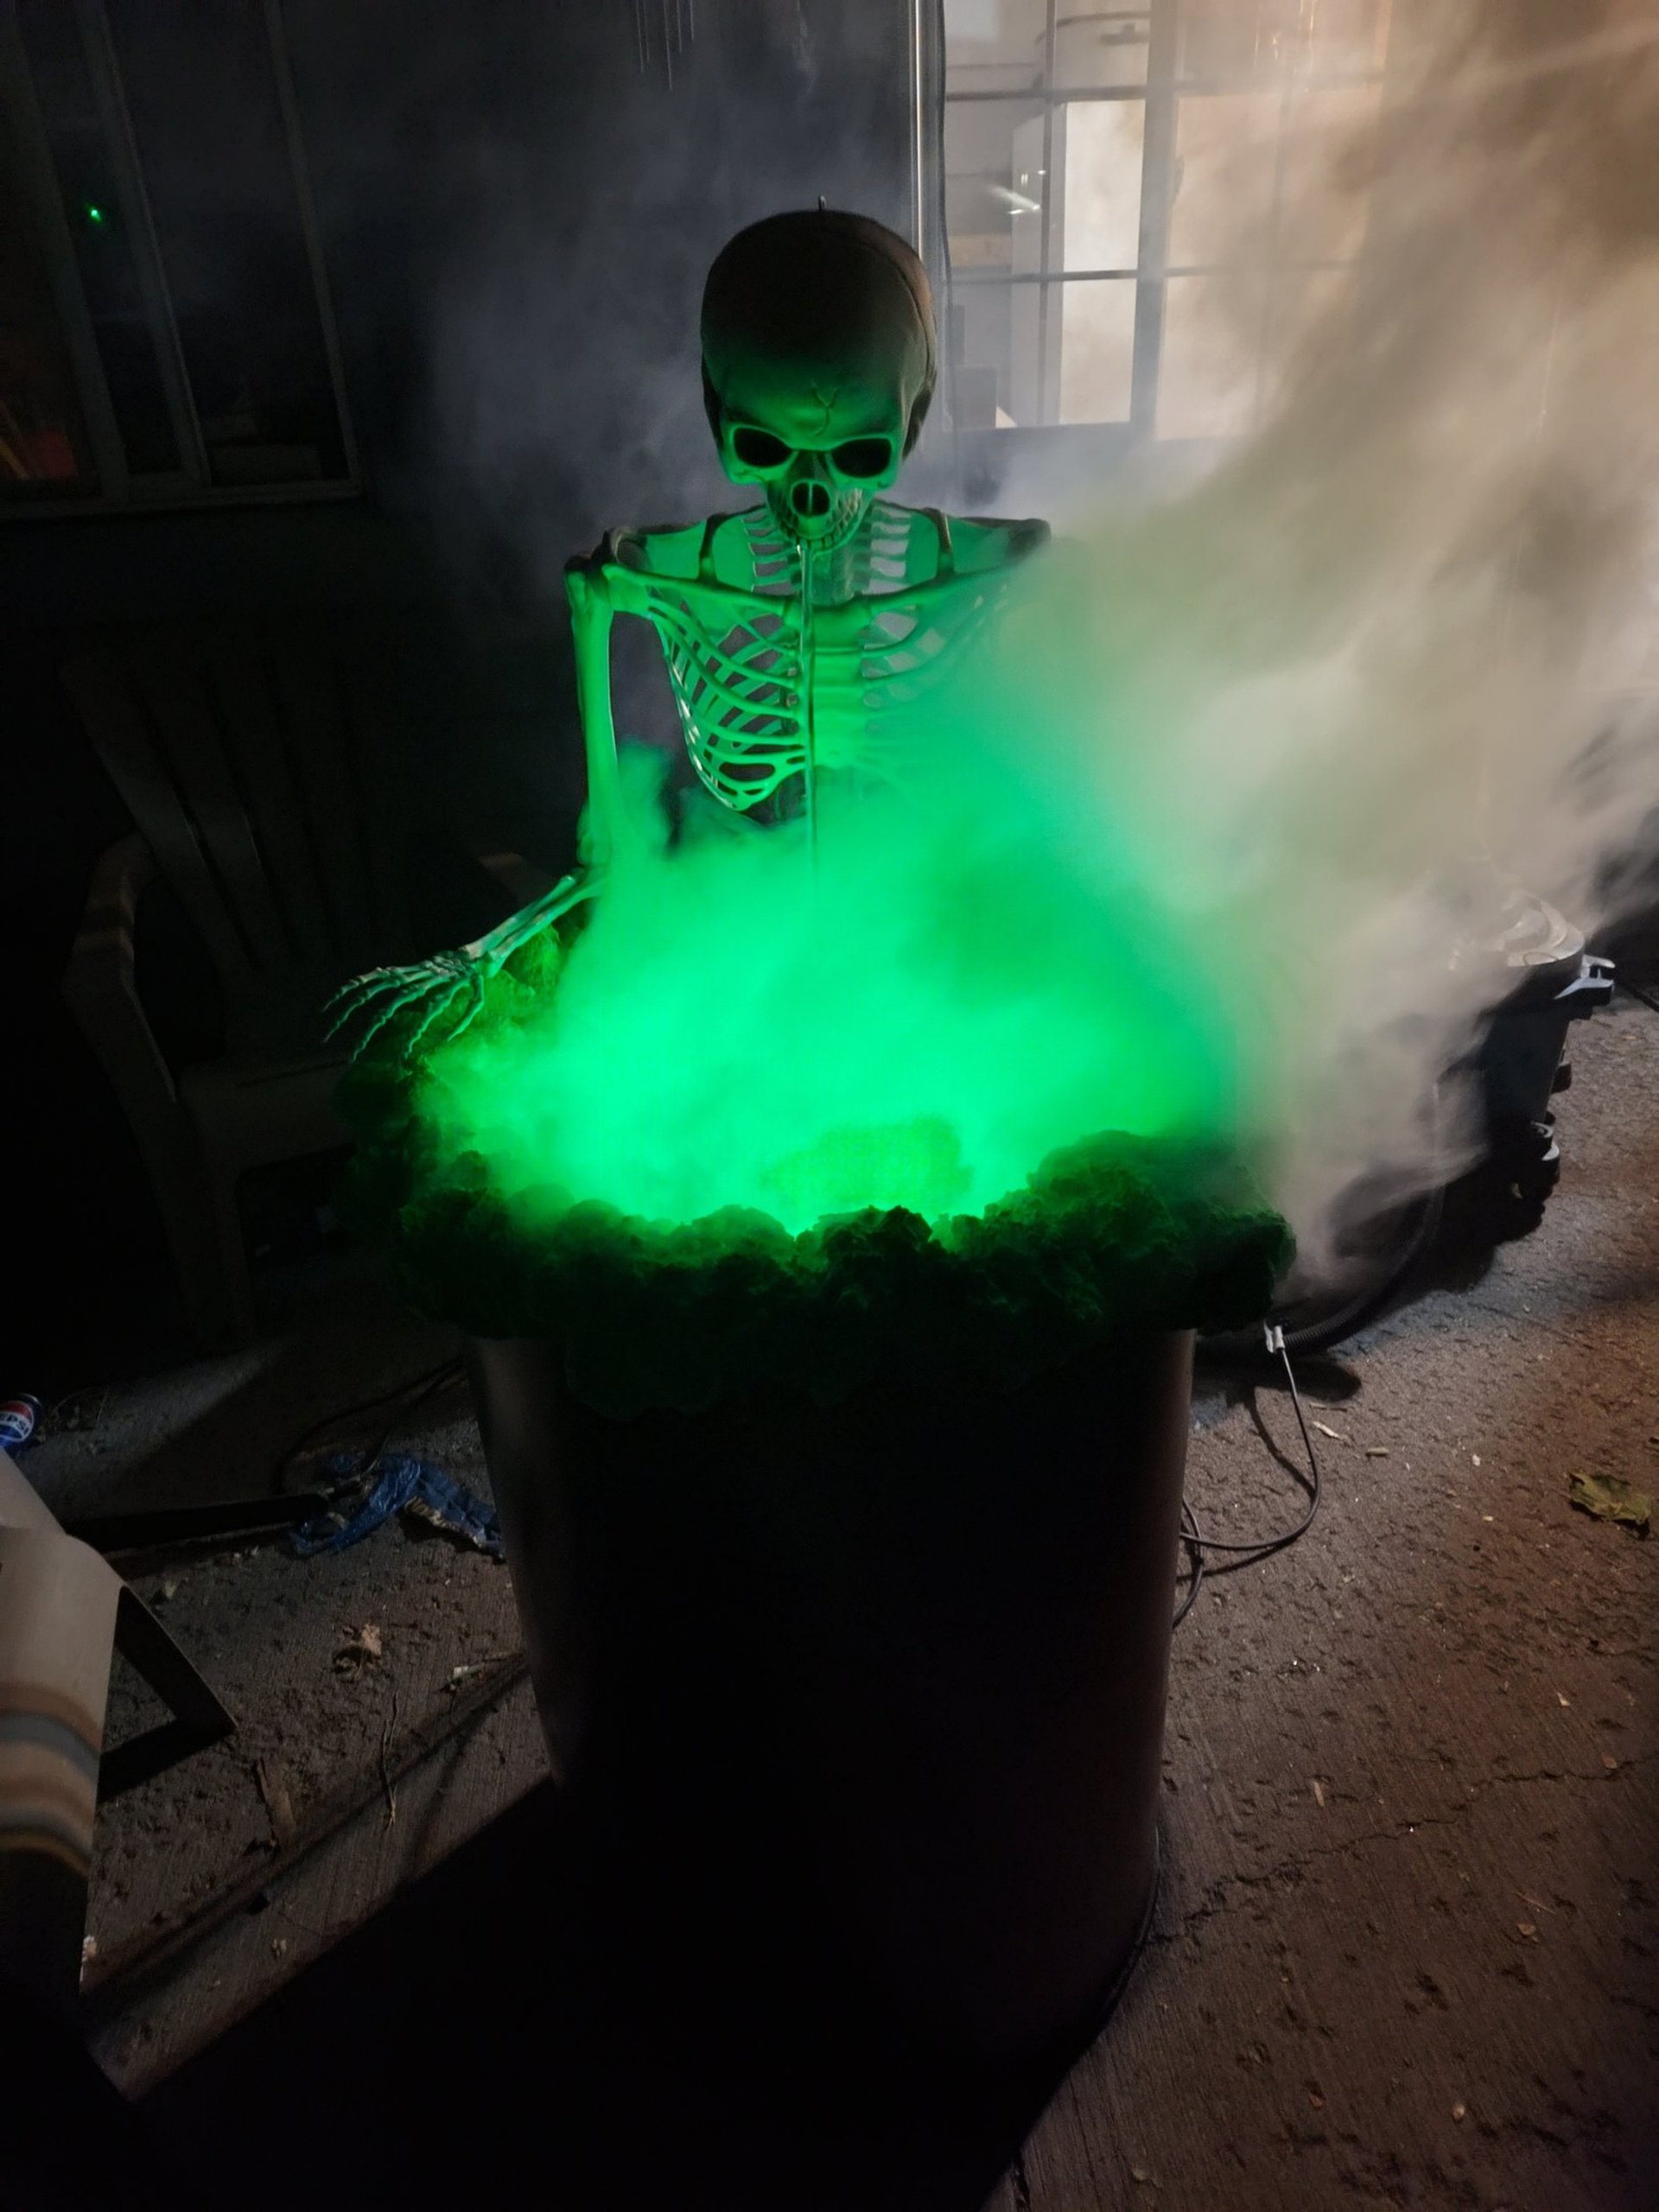
This overhead UV lighting is what gave the fountain its powerful “radioactive green” look.
2. Let the fog machine inside the barrel do its work.
Because the fog machine is inside the barrel (elevated on the coffee tin):
Fog spills out the top of the barrel.
Fog drifts through the UV light coming from above
The glow becomes even brighter as fog catches the blacklight beams
This creates that toxic, glowing mist effect people notice from far away.
3. Test the setup in the dark.
Turn off all regular lights and check:
Does the foam glow bright enough?
Do you like how the UV hits the skeleton from above?
Does the fog catch the light in the right places?
Do you want more green paint or different blacklight angles?
A quick nighttime check lets you fine-tune everything.
✔️ Why This Step Works So Well
Overhead UV lighting is much stronger and more even than ground-level UV
It keeps the illusion clean (no lights visible)
Fog rising from the barrel into downward-shining UV creates the perfect toxic look
The fountain becomes the centerpiece of the entire carport haunt
Step 7 — Testing the Water Flow and Fine-Tuning the Fountain
Once the lighting, fog machine, and tubing were all in place, the last big step was testing the water flow.
This is the part where you figure out the perfect angle, fix splashing, and make sure everything cycles cleanly.
Here’s exactly how I did it:
1. Fill the bucket with water.
Use enough water so the pump stays fully submerged when running.
(Deep buckets like the Harbor Freight one work perfectly for this.)
2. Plug in the pump and test the flow.
The moment the water starts moving, watch for:
Where it pours from
How fast it flows
Whether it hits the skeleton correctly
If it splashes outside the barrel
If the stream is smooth or needs adjusting
This step tells you everything you need to fix.
3. Adjust the skeleton’s angle if needed.
Sometimes a slight tilt forward or backward makes a huge difference.
You can:
Tighten or loosen zip ties
Shift the spine
Move the head or arms
Adjust the rib cage position
Tiny changes fix big splash problems.
4. Adjust the tubing for cleaner flow.
If the water was splashing or missing the bucket, I:
Pulled the tubing back slightly
Adjusted how far it stuck out
Changed the direction it pointed
Tightened or repositioned the zip ties
You want the water to fall cleanly into the bucket without spraying.
5. Run the test a few times.
Let it run for several minutes to be sure:
The water cycles smoothly
The pump isn’t running dry
The splash stays inside the barrel
The foam and paint stay dry
Tubing doesn’t shake or slip
Testing more than once prevents surprises later.
6. Check for any leaks or drips.
The drainage holes you drilled in the bottom help with this.
Make sure:
No cords or power strips are near any damp areas
Fog machine stays dry on the coffee tin
Water isn’t escaping around the edges
✔️ Why This Step Matters
Prevents mess or damage on Halloween night
Ensures your fountain runs for hours
Keeps the fog machine safe
Makes sure the “toxic” effect looks intentional, not chaotic
Helps everything glow perfectly in UV
Final Notes
This build was inspired by a concept I saw on Pinterest — but everything about it was rebuilt in my own way, with the materials I had, the mistakes I made, and the style that feels like home. What started as an idea became something uniquely mine.
Building this fountain wasn’t just about making a decoration — it was about turning scraps, leftovers, and a half-formed idea in my head into something that looked alive.
A lot of the process was figuring things out as I went, adjusting angles, testing light, and trusting the chaos of the build.
Every part of this project can be customized. Use whatever barrel, skeleton, tubing, or lighting you already have. The “toxic” effect comes from the glow, the fog, and the way everything blends together in the dark. There is no wrong version of this build — only the one that works for your space.
What I Learned During This Build
Test your water flow multiple times.
One small angle difference can make water splash in weird places.
Clear tubing hides perfectly under UV light.
It lets the water look like it’s coming straight from the bones.
Spray foam looks crazy when wet, but perfect once painted.
Trust the process — the mess is part of the magic.
Elevating the fog machine is a must.
Condensation is real. That coffee tin saved mine.
UV lighting changes everything.
The paint doesn’t look impressive until the blacklights hit it.
String lights inside the barrel glow softer than LED floods.
It gives a more eerie, haunting effect.
Zip ties are your best friend.
Everything in this build depends on them.
If You Recreate This…
Feel free to message me or send pictures if you make your own version — I absolutely love seeing other people’s haunted creations. And if you want more builds, DIYs, or behind-the-scenes walkthroughs, you can explore the rest of my Things I Make section.
This is just one of many strange little creations I plan to share.
There’s a lot more to come.
Connect
Reach out to share stories or questions.
defiantheartcreations@outlook.com